Hello,
On photo-realistic rendering programs like Vray or Thearender, the camera setting is often a critical point, especially for people like me who have no knowledge of photography.
Indeed, the parameters of the camera are essential for the lighting of the scenes, especially indoors, so as not to end up in a cellar or in an incandescent light halo.
The problems are multiple and it is difficult for a beginner to know that the problem comes from the camera settings:
- Image too dark indoors or even black
- Image too bright
- Small points called grain everywhere
- Image completely blurred
On cameras and photo-realistic rendering programs 3 settings will be important:
-
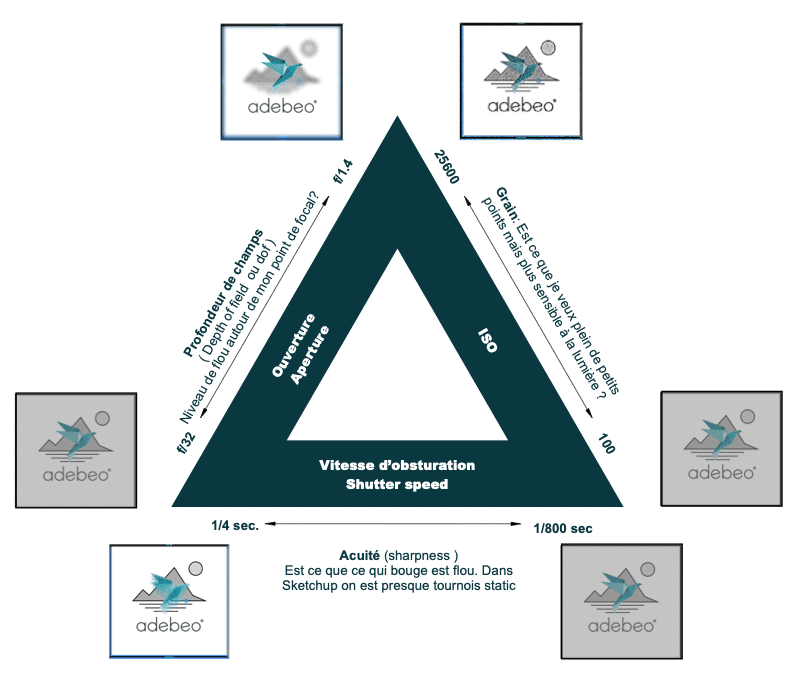
- THE ISO. On silver cameras (you know the ones from the past) you had to put a film in the camera. These films were more or less sensitive to light. Thus a very sensitive film, with an important ISO, was going to print very quickly the light and thus was going to be ideal for interior scenes where the light is much rarer than outside. But a too sensitive film could make a burnt image. In photo-realistic rendering programs, ISO is perfect for making a scene that would be a bit dark brighter, but abusing it causes grain.
- The shutter speed corresponds to the time of taking the photograph. The faster the shutter speed, the more the elements that will be in motion will appear frozen. The longer the shutter speed, the more time the light has to print the film and therefore the brighter the image. In Sketchup and Vray or Sketchup and Thearender, most of the renderings are static and the shutter speed is the right parameter to set the brightness.
- The aperture corresponds to the diameter of the opening of the camera, the larger the aperture the more light enters, the brighter the image. The aperture diameter in photorealistic rendering programs is mainly used to ‘blur’ the environment on our project but it also plays on the brightness.
I made a small graph to show the impact of these different settings:


